Instead of manually uploading every client recording, set up VideoText automatic transcription in Zapier so each new video or audio file enters the transcription workflow and reaches the correct destination. The VideoText Zapier integration is best for transcriptionists, subtitle editors, podcast teams, and media agencies that need repeatable file-based processing.
TL;DR
- The videotext zapier integration connects a file trigger to automatic transcription in 2026.
- You need access to Zapier, VideoText, the source app, and the output destination.
- The connector can automate transcription, subtitle fixes, translation, burn-in, and compression.
- VideoText supports SRT, VTT, TXT, PDF, DOCX, JSON, and CSV outputs.
- Keep source and output folders separate so completed files do not restart the Zap.
Why this matters
A Zap is an automated workflow with a trigger and one or more actions. The trigger detects a new file. The actions send that file for processing and route the result without another manual upload.
A reliable 2026 transcription Zap has three stages:
- Source trigger: detects the new video or audio file.
- Transcription action: sends the accessible file to the connector.
- Destination action: stores or shares the returned transcript or subtitle file.
Automation removes repetitive transfer and naming work. It does not remove editorial review. ASR output still needs checks for names, terminology, speaker labels, punctuation, and unclear speech before client delivery.
The main advantage is consistency: every qualifying file follows the same processing and routing steps. The main limitation is maintenance. Expired account access, renamed folders, changed permissions, and incorrect field mappings can stop an otherwise valid Zap.
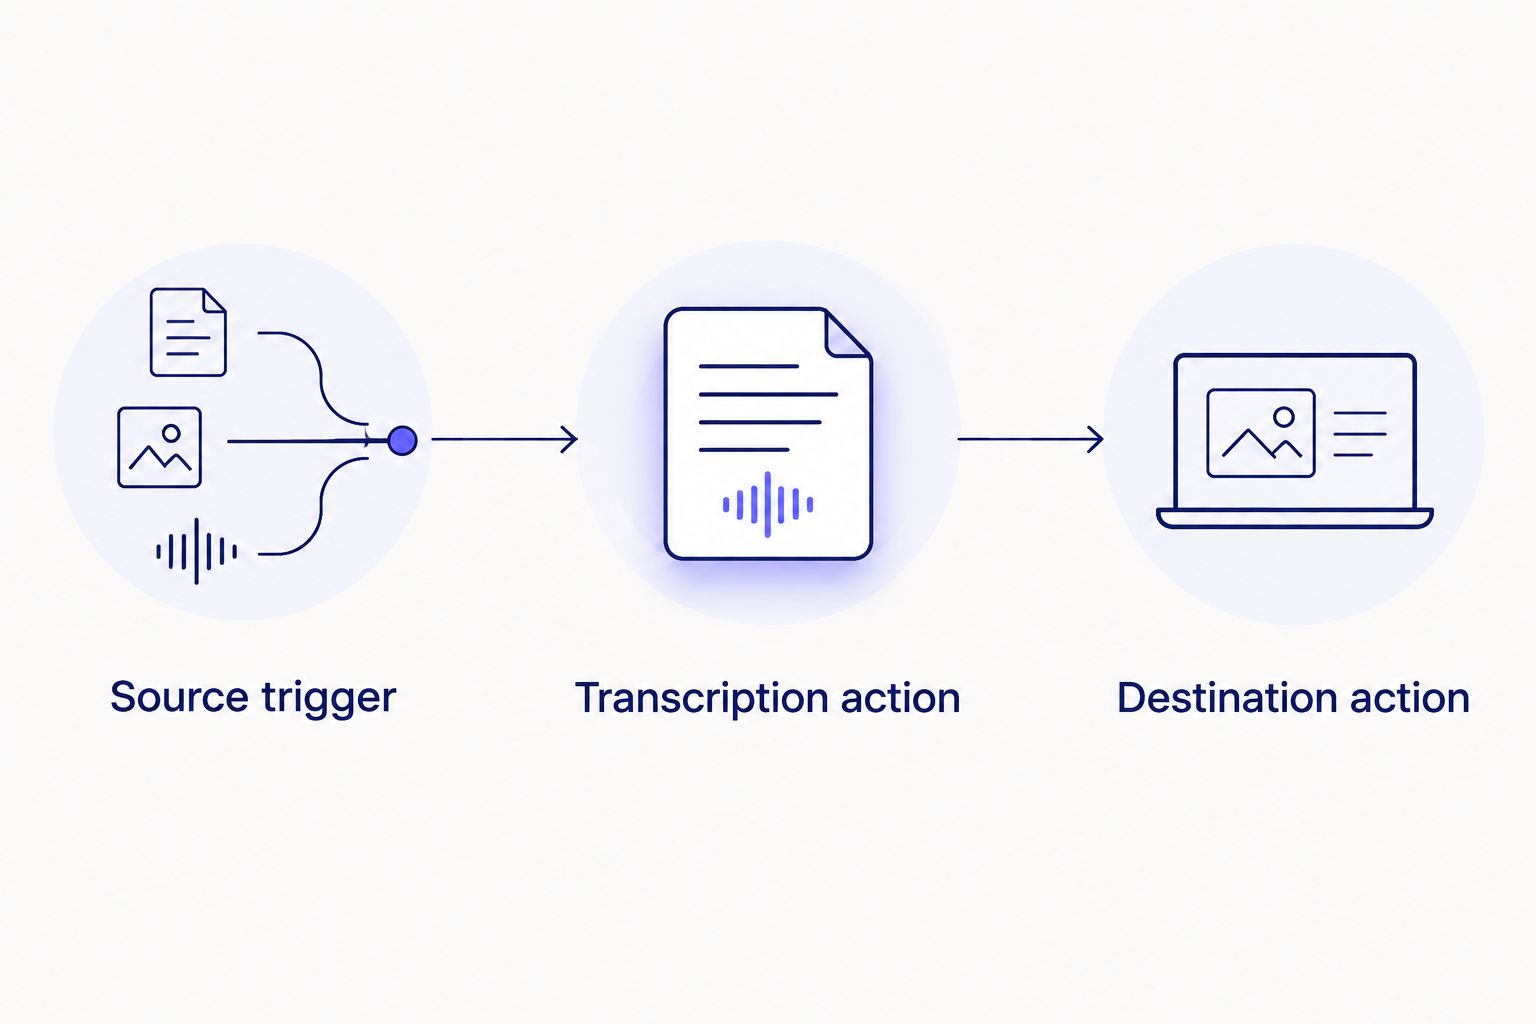
The trigger finds the file, the transcription action processes it, and the destination action routes the result.
Before you start
Prepare the accounts, files, and permissions before opening the Zap editor. This prevents connection and mapping problems halfway through setup.
- Account access: sign in to Zapier, the transcription platform, the source storage app, and the destination app. Use an account that can read the source file and create content in the destination.
- A representative test file: use the same media type your production workflow receives. A tiny placeholder text file cannot confirm that media transfer, transcription, and output mapping work.
- A dedicated intake location: create a source folder or equivalent queue that contains only files intended for processing.
- The non-obvious gotcha: never save completed files into the folder monitored by the trigger. That layout can create a loop in which an output file starts another run.
For a 2026 production workflow, confirm that the source app provides the actual file or an accessible download link. A file name, preview page, or internal record ID alone is not enough for a transcription action to retrieve the media.
Set up the source trigger
The trigger defines exactly which event starts automatic transcription. Keep its scope narrow enough that test clips, exports, and unrelated documents do not enter the processing queue.
- Open Zapier and select Create, then choose Zap.
- In the Trigger step, open App and select the service that receives your source files.
- Under Trigger event, choose the event for a newly created file or newly added item. Use a completed-file event when the source app provides one.
- Under Account, connect the source account and approve read access to the intake location.
- Select the exact folder, drive, form, or upload queue that should start the workflow.
- Select Test and load a representative video or audio record.
Inspect the test data before continuing. The sample must expose a downloadable file, a direct file object, or another media field the next action can retrieve. Do not map a thumbnail, preview-page address, folder address, or plain file name as the media input.
Expected result: the trigger test displays the intended source item and includes an accessible media field. If the test returns an old or unrelated item, place a fresh sample in the intake location and test the trigger again.
Configure the VideoText action
The action sends the trigger file into the selected processing workflow. For this guide, choose the event that creates a transcript from uploaded video or audio rather than an event for subtitle repair, translation, burn-in, or compression.
- Add an Action after the trigger.
- Under App, search for and select VideoText.
- Under Action event, select the transcription event displayed by the connector.
- Under Account, connect the correct workspace by following the authentication prompt. Do not enter a normal account password into a field that requests a connection credential.
- Map the action's media input to the downloadable file or file object confirmed during the trigger test.
- Set the requested transcript options. Enable speaker diarization when separate speaker labels are required.
- Select an output format that matches the next step, then choose Test.
The available output catalog includes seven named formats: TXT, SRT, VTT, PDF, DOCX, JSON, and CSV. SRT and VTT are the two timed-text choices in that list. TXT and DOCX suit transcript editing, while JSON and CSV suit structured downstream processing.
For 2026 subtitle delivery, choose SRT or VTT when the destination must retain cue timing. A plain TXT transcript contains text but is not a substitute for a timed subtitle file.
Expected result: the action accepts the media input and returns test data from the transcription workflow. Review the returned fields before building the destination step; map only fields that are present in the test result.
Route the finished output
The destination action decides where editors, clients, or another system receive the completed material. Match the destination field to the returned data type instead of forcing every output into a document field.
- Add another Action after transcription.
- Select the destination app used by your team, such as connected cloud storage, a document workspace, or a team notification tool.
- Choose an event that creates a file, document, record, or message as required by that destination.
- Map transcript text into a text field. Map an SRT, VTT, or document file into a file field. Map a share link into a URL field.
- Build the destination name from stable source metadata, such as the original base name plus a transcript or subtitle suffix.
- Select Test and inspect the created destination item.
Do not expose client media or transcripts through a public channel unless that routing is part of the approved workflow. Account permissions in the destination app still apply after Zapier creates the item.
Expected result: the destination contains the correct transcript text, timed subtitle file, or processing link and preserves enough of the source name to identify the client job.
Test and publish the full Zap
A successful action test proves only that one sample passed through one step. Run the complete sequence before selecting Publish.
Use an audio file, a video file, and an SRT draft when those inputs are part of your normal workload. Confirm each of these points:
- The source event starts only once for each new item.
- The action receives the full media file rather than a preview.
- The selected output format reaches the correct destination field.
- File names remain identifiable after routing.
- Speaker labels appear when diarization is enabled.
- The output folder does not feed back into the source trigger.
Open Zapier's run history after the production test. Check the input and output for every step, then select Publish only after the destination result matches the required handoff.
Variant: fix subtitles when an SRT is added
The adjacent 2026 workflow starts with a draft subtitle file rather than raw media. It is useful when another editor or transcription system already produced the SRT, but the cues still need checks for overlaps, CPL, CPS, gaps, line breaks, grammar, filler cleanup, scene-cut spans, or timing drift.
- Change the source location to a folder or queue containing draft SRT files.
- Keep the trigger scoped to new or updated files, depending on whether revisions should run again.
- In the connector action, select the subtitle-fixing operation instead of transcription.
- Map the SRT file as the source and select the required correction or formatting options exposed by the action.
- Route the corrected SRT to a separate review location.
- Review the corrected cues in the browser editor before client delivery.
Expected result: each qualifying SRT enters subtitle QA and the corrected file reaches the review destination without replacing the original draft.
| Workflow |
Input |
Output |
Best for |
Advantage |
Limitation |
| Automatic transcription |
Video or audio |
Transcript, SRT, or VTT |
Editors starting from source media |
Removes the manual upload step |
ASR wording still needs editorial review |
| Subtitle fixing |
Draft SRT |
Corrected SRT |
Subtitle QA editors |
Checks timing and formatting issues |
Cannot repair recognition errors without checking the source media |
| Subtitle translation |
Finished transcript or subtitles |
Translated transcript or timed subtitles |
Multilingual delivery teams |
Preserves timing on subtitle cues across 70+ languages |
Names, terminology, and context still require language review |
Troubleshooting
The trigger shows a file name but transcription receives nothing
Map the downloadable file field, not the visible name or preview page. Retest the trigger and inspect each returned field until the sample exposes the media itself or an accessible file address.
The Zap starts before a large upload is usable
Use a completed-upload trigger when the source app provides one. Otherwise, insert a delay or another readiness check between the trigger and transcription. The action must not attempt retrieval while the source service is still writing the file.
The same job runs repeatedly
Check whether the destination action writes its result into the watched source folder. Move finished files to a separate location and restrict the trigger to the intake folder. Also check whether renaming or updating a source item counts as another trigger event.
An SRT or VTT file fails the subtitle-fixing action
Validate the timed-text structure before sending it. SRT cues require sequence numbers, timecodes, and cue text in the correct order. A WebVTT file requires its WebVTT header and valid cue timing. A renamed TXT file is not automatically a valid SRT or VTT file.
The Zap succeeds but the destination content is wrong
Open the run history and compare the transcription output with the destination input. Text belongs in text fields; downloadable subtitle and document outputs belong in file fields. Retest after correcting the mapping instead of replaying the same malformed destination step.
Start automatic transcription
Connect your workspace, map one test file, and verify the output before publishing.
Open your workspace
Customize your workflow
A strong 2026 setup can branch by file type or client requirement. Use Zapier filters so only intended media reaches transcription. Use separate paths when one client needs a clean transcript and another needs timed subtitles with speaker labels.
You can extend the sequence with summary and chapter generation, subtitle repair, guideline formatting, translation, burn-in, or compression. Keep each processing stage explicit so a failed translation does not hide a successful transcript. Teams using batch processing should also account for the Pro+ requirement and keep ZIP exports separate from the watched intake location.
Preserve the original media and first transcript as source records. Route corrected, translated, and burned-in outputs into distinct destinations so editors can identify which stage produced each file.
FAQ
What does the videotext zapier integration automate?
It automates file-based transcription and related processing after a connected app detects new input. The workflow can also cover subtitle fixes, translation, burn-in, compression, and output routing.
What accounts are required for automatic transcription with Zapier?
You need access to Zapier, the transcription workspace, the source app, and the destination app. Each connected account must have permission to read its input or create its output.
Can the workflow transcribe both video and audio?
Yes. The transcription pipeline accepts uploaded video or audio as source media and creates timed transcript segments for downstream output.
Which transcript and subtitle formats can the workflow export?
The named export formats include TXT, SRT, VTT, PDF, DOCX, JSON, and CSV. Choose SRT or VTT when the destination requires timed subtitle cues.
Can automatic transcription label different speakers?
Yes. Enable speaker diarization when the action exposes that option, then review and rename detected speakers in the editor before delivery.
Can Zapier start subtitle QA instead of transcription?
Yes. Use a draft SRT as the trigger file and select the subtitle-fixing operation. That workflow can check overlaps, CPL, CPS, gaps, line breaks, and timing drift.
Can the workflow translate subtitle files automatically?
Yes. Subtitle and transcript translation supports more than 70 languages, and subtitle cue timing is preserved. Human review is still required for names, specialized terms, and context.
Does automatic transcription support batch files?
Batch processing and ZIP exports are available on Pro+. Keep batch outputs outside the watched intake folder to prevent repeated runs.
One last thing
Keep the editable SRT or VTT master even when the final workflow burns subtitles into video. Burned-in captions become part of the encoded picture and cannot be edited as a separate subtitle track. That single 2026 archive rule prevents a small wording correction from turning into a full repeat of the burn-in step.
Related guides